Option Archery Sight Installation and Operation
S-SERIES OPTION SIGHT (4s/6s/8s Models): Installation and Operation
Here is our quick guide on how to set up and adjust your Option Archery bow sight. Included are installation and operation instructions that explain the use of the Option Sight from start to finish. Sight tape instructions, 2nd / 3rd axis, and warranty are also covered.
Included in the package: Sight Tapes for the mover pin, Quiver Adapter Plate and Standoffs, Allen Wrench Set


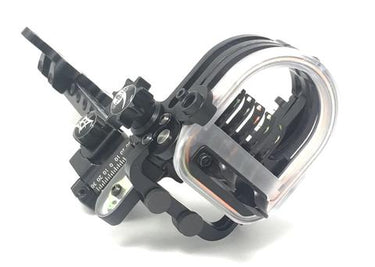
1. Attach to bow: We have provided two sets of mounting screws, (a) and (i), for use with or without the included quiver adapter (j). With or without using the quiver adapter, you will have the option of mounting to the bow in one of two positions. For most bow setups you will want to mount to the bow using the bottom hole, and the 2nd hole from the top. But if you have a low peep height, or want your sight lower for any reason, use the top hole and 2nd from the bottom. It is fine to use Loctite on these screws if desired, but heavy Loctite can be very hard to remove later.
2. Windage and Elevation Adjustment: You may want to adjust the windage to get your sight set for approximate center-shot before you start shooting. To adjust either the windage or elevation gang adjustments you will need to loosen the appropriate lockdown screw ((f) of (h)), then adjust by turning the appropriate micro-knob ((g) or (b)). Make sure to snug down the lockdown screws. If you need to adjust either the windage or elevation more than the micro-drive travel allows, you can remove the lockdown screw ((f) or (h)), and move it to the next hole.
3. Check/Adjust Mover Pin to Align with Fixed Pins: From the factory the mover pin is set to line up with the fixed pins (for windage), but each of us hold our bow differently, so you will need to check this. Draw your bow and see if the pin is lined up perfectly (left and right) with the fixed pins. If it is slightly inside (or outside), open the pinguard, loosen the small set screw (o) that locks the mover pin (the mover pin will need to be near the middle of the vertical travel range to access this set screw). Now you can move the pin left or right (manually, with your fingers) and lock the set screw down again (be careful not to strip it). Make sure you have the fiber facing directly at your eye also. This adjustment will only need to be made once for each bow/shooter combination.
4. Level the Sight to Your Bow for 2nd Axis: Your sight comes roughly adjusted for 2nd axis, but now is a good time to check this. The goal is to have the level bubble centered when you bow is vertical. If you don’t have a level for reference, you can usually use the side of your riser as a reference. On cam designs that have the bowstring leaving the came at the same place (distance from limb), you can also use your bowstring as a vertical reference. 2nd Axis is adjusted with the 4 screws (c). By loosening either the top two (or bottom two) screws, and tightening the other two, the sight is leveled. Once leveled, snug all four screws down securely. Do Not over-tighten.
5. Sight Mover Pin in for 20 yards (or meters): If you want to use our provided “sight-in tape”, remove (or cut) one out of the tape page provided. Adjust the mover pin all the way to the top of its travel range (or wherever you want your 20) then peel the backing off the tape and install so the 20 reference on the tape lines up with the indicator blade (m). The indicator blade is adjustable vertically for fine tuning, by loosening the lockdown screws (l). Now shoot at 20, using the windage and elevation gang adjustments (as described in #2 above) to move arrow impact until you are in the spot. We have a “zero-stop” available upon request, that will make the mover pin stop about ½” lower in your sight picture, if you would like your 20 setting lower. Note: if your sight is more than 3/8” above, or below, the “zero” setting for elevation, you may also adjust the sight head up or down by moving the 2nd Axis screws accordingly.
NOTE: REFERENCE PICTURES ON BOTH SIDES OF THIS SHEET!
6. Sight-in Mover Pin for 50 and Pick Sight Tape: Now step back to 50 and move your mover pin down until your arrows are in the spot again. Now, look at where your indicator pin (m) is pointing on the sight-in tape. By looking at exactly where (in a given color band) it is pointing, you will be able to pick the corresponding sight tape. Now you can remove (or cut) the sight tape out, and peel and stick.
7. Set Your Fixed Pins: After you have confirmed that you have the right sight tape installed, you can set your fixed pins using the mover pin as a reference. Simply set your mover pin to the desired yardage, then open the pinguard and adjust with screws (k). DO NOT OVER-TIGHTEN THE ADJUSTMENT SCREWS!
NOTE FOR FIXED PIN ADJUSTMENT: You may need to loosen the screw a couple complete turns, then push (with allen wrench) the screw toward the pin base. This will push the pin base back out of the bottom of the track, and make it easier to slide for adjustment. This tolerance is purposely tight to ensure the pin cannot rotate in the track. You may also want to steady the pin with your finger while tightening the screw to insure it stays parallel.
8. Level (or sight-in) 3rd Axis: Leveling your sight for 3rd Axis will give you confidence for up and down hill shots. If you have a 3rd Axis leveling device this works very well, but assuming you do not have one this sight allows you to sight in your 3rd Axis. Using either an uphill or downhill target, shoot your first arrow aiming at the spot with the level bubble held level. If you arrow impacts either left or right, simply loosen the screw (p) on one side of the bubble slightly, and tighten the other the same amount. Continue to adjust in small increments until your arrow impacts center left and right. Snug down the screws, don’t over-tighten.
9. Tension Adjust for Mover Pin Adjustment: If you want to increase (or decrease) the resistance on the mover pin adjustment knobs, this is easily achieved. One of the knobs (usually the bottom one) is threaded onto the helix drive rod. Loosen the set screw in the adjustment knob that is threaded, and simply tighten or loosen the knob while holding the opposite knob from turning, then snug the set screw back down.
10. Adjusting the Mover Pin Assembly: This is adjusted when the sight is assembled, but if you ever need to adjust or tighten the mover pin assembly (mover pin, mover pin base, and fiber guard), simply slightly loosen both screws (q). Now, Hold pressure against the end of the mover pin fiber guard (pushing toward the sight housing) to compress the felt backer between the fiber guard and the sight housing, and tighten the screws (q) while holding.
11. Maintenance and Lights: Your new sight will be virtually maintenance free, and is covered by a lifetime warranty, but if the mover pin ever gets gummed up or you feel any grinding when adjusting, you may need to clean the drive system. Simply loosen the set screw in one of the mover pin adjust knobs and remove the knob. This will allow you to remove the helix rod and clean any dirt or debris off of it. We also offer optional lights that can be attached to either the mover pin light adapter (n) for fixed pins and/or the light adapter (e) for the mover pin. Please refer to our website for reference or purchasing the sight lights, multiple lights are available. Contact us with any questions you might have!
Option Archery, LLC - phone: (406) 826-0603 - email: info@optionarchery.com
© 2026 Option Archery